Tuesday, November 5, 2013

Shabby Chic China Cabinet

Mom found this beautiful china cabinet and immediately I wanted to get my hands on this thing and shabby chic it up!  The front has glass on it, not a mirror, although it does look like a mirror.
 The back of it was really messed up so I decided to just cut a new piece of wood for the back.
First thing, sand it.  So, I used my electric sander to knock off the sheen so the paint would stick to it.  Then primer.  I just used a basic white primer.
Once I let the primer dry for a couple of hours, I started the process of painting it.  I used a seafoam green color to paint it with.
 After applying the green, I mixed the green with some water and used a sponge to rub off some of the paint for the shabby look.  Other spots I used a light grit sand paper, but I was really going for a light/dark look for this piece.
After I got the look that I wanted, I applied my favorite sealer, which darkened it a bit just like I envisioned.

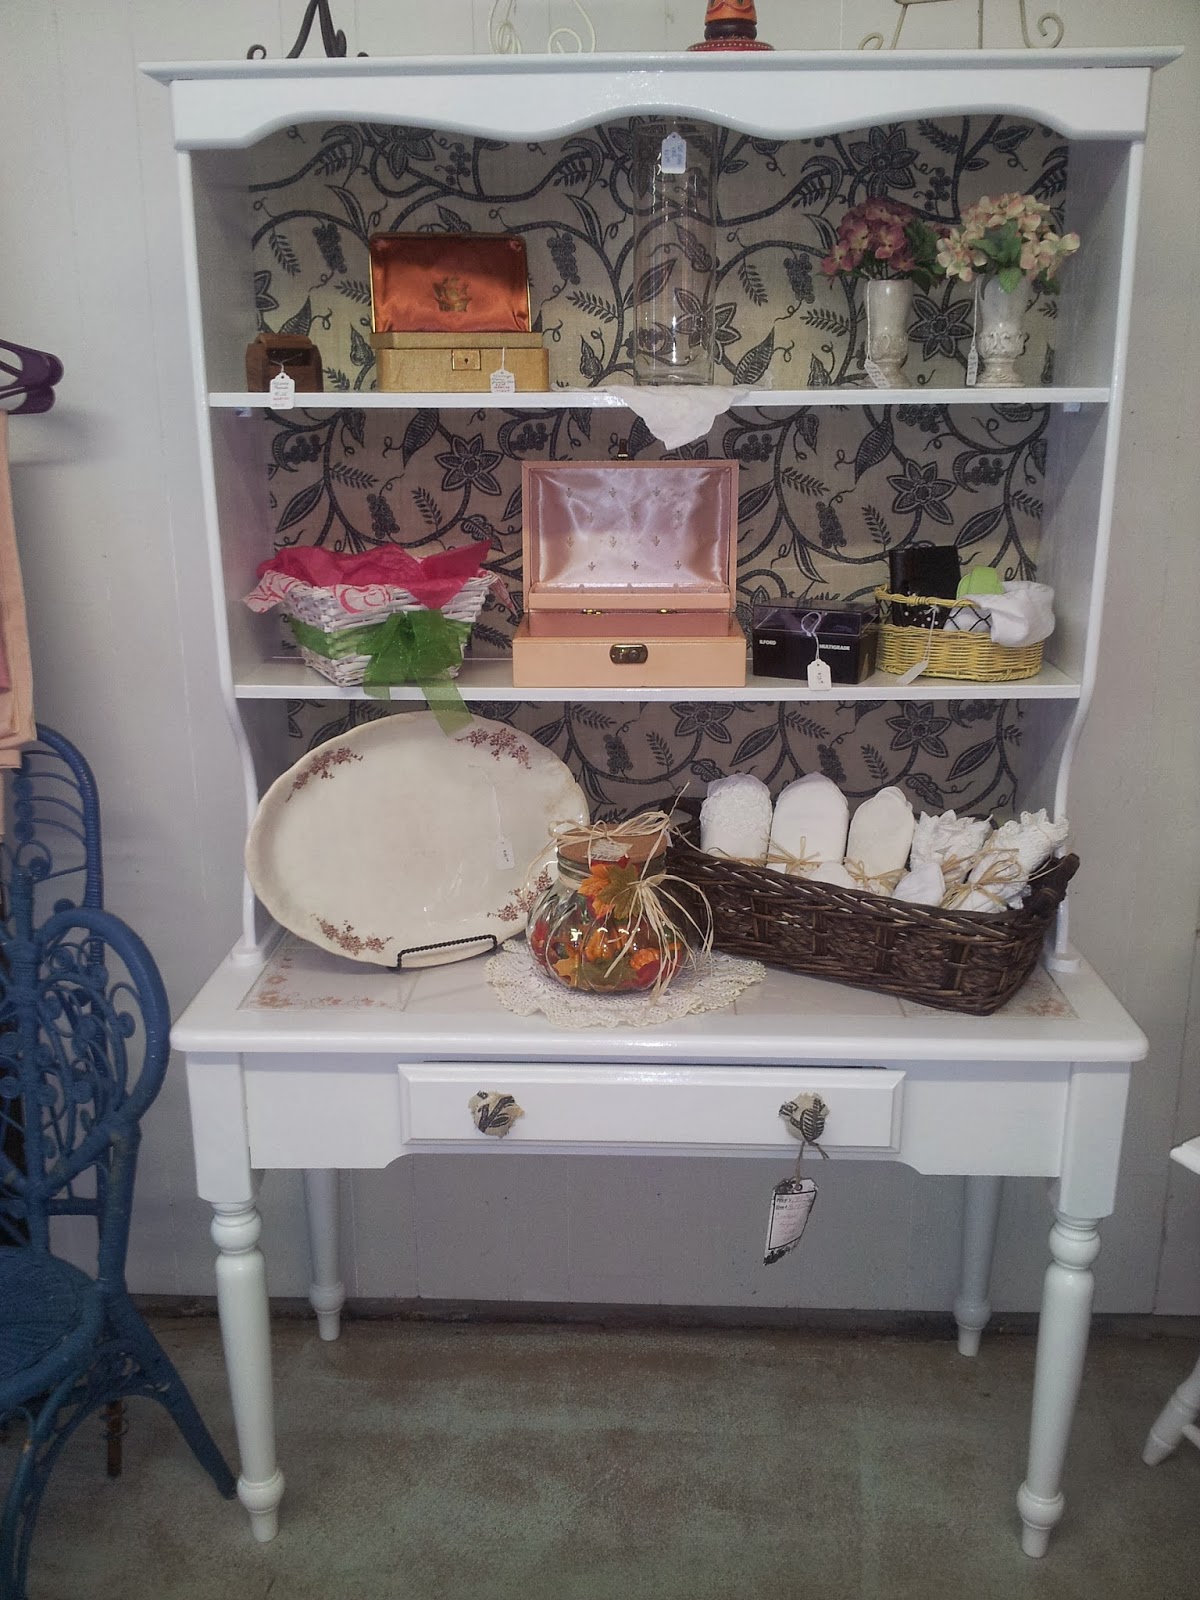
After I sealed it, my mom and I headed to our favorite store, Hobby Lobby, and found this really pretty designed fabric.  We came back home, hubby cut the wood to replace the back for me and I sprayed a glue adhesive to the wood and had mom help me stretch it across the back.  I let that dry for a few hours and then attached it to the back of the china cabinet.  Done!
Here is the finished product!  I just love this shabby chic look.  I want to do my whole house like this.  One day... maybe... if I ever get the time to do it.  :-)

 photo Untitled-2-1.gif

Coffee and End Table Redo

Mom and I picked up this set of coffee and end tables at a yard sale and there was some things that were missing... there were these decorative wooden bars across the bottom so I just cut them off with a saws-all.  Mom filled it with wood putty and sanded that down along with the rest of the tables.  Then it was time for paint...
First coat was a white primer then she put a yellow color on it.
After the yellow became a little tacky, she hit some areas with a fine grit sand paper and gave it the shabby chic look.  Finally, the sealer was put on it.
This is the BEST sealer out there in my opinion.  When you apply it, you have to make sure that there are no drip marks and then let it dry for at least 24 hours before handling it.  The finished product is simply gorgeous!  The sealer makes the color deeper.  You can put up to 3 coats of this, depending on the wear and tear that you are anticipating for the piece that you are working on.  So, here's the finished tables!
The color is much deeper than we wanted, but in this business, one thing that I have learned is that it doesn't matter what we like, it's what the customer wants.  Needless to say, these gorgeous tables didn't even last a week!  They were GONE FAST!

 photo Untitled-2-1.gif

Cottage Style Hutch Redo

This little hutch has been in and through our entire family.  It started out at my mom's and was there for years until I acquired it.  Then I passed it to my brother and eventually it ended up back at my mom's.  This hutch has done more traveling than Gulliver!  When my mom and I opened our little "Simply MarValUs" booth at The Blue Moon, this was one of the first things that we brought down there.  Well, we have moved to the front of the building from the back, and then over to a window unit since we opened... and this little hutch has been traveling all the way.  My mom and I decided that it needed a facelift so we took it to the house and started working on it.  

Hutch before
So... we loaded it up and took it to the house.  My papa took it apart for us and I started painting it.  The back of it needed a little something more, so we found this pretty burlap material and I put it on the back of the panels with some modge podge.
I watered it down, and I think I watered it down too much and didn't get all the fabric so some of it bubbled up, so make sure when you coat it, you do it well.  I did this on the back of my husband's truck at night... probably shouldn't have done that... but it all worked out.
I let it dry over night and then took it back to mom's and after 2 long and quite irritating hours, we manage to get it back together and more secure than it was before.  :-)  And... here is the finished product!
So much brighter and so much more lovely than before.  We even have a table that matches it and I took the extra material and made some table settings for the table that matches the hutch.

So, 4 coats of white laytex later on each piece, some crafty craftin' on the table settings, we have a beautiful cottage style/farm style hutch and dinette set.  
 photo Untitled-2-1.gif

Homecoming Top Hat

So, my daughter didn't want an updo for homecoming and asked me for something to "decorate" her hair without having to put it up.  So, I got the idea that it would be cute to have a little hat on her head.  I could have probably made 10 of these things with everything that I bought to make this one hat, but we do anything for our little princesses, right?  So... the day before homecoming, I broke out the glue gun and all the stuff purchased from Hobby Lobby and started making her a little hat.
Here is what you will need:
Ribbon
Flower
Feather
Beads or something similar for that "bling" factor
Doll hat
Headband
Hot glue gun

I used a strip of beads that were made like ribbon and wrapped it around the hat, hot gluing it about every inch to make sure it was secure.  (Excuse the gross looking thumb, that was incident that happened on a previous project...)

After wrapping the beadwork around the hat I glued the flowers in place.  You can use ribbon or anything else you want to glue on the hat.  Make it your own!
After gluing the flowers on there, I glued a pretty diamond like pendant in the center of the flower to give it a little more bling.  She wanted it off center so after the hat was all done, I glued it off center for her.  And that's it!  Easy peasy lemon squeezy!  You can use just about anything you want to make this adorable hat, I just had to get things that matched her dress, which turned out great!  Here's my Bella ready for the ball!
Share your photo if you have done something similar!  I would love to see what you create!!!

 photo Untitled-2-1.gif

Thursday, October 10, 2013

Shabby Coat Rack

It's been a while since the last post, but things have been just crazy busy!  My mom and I have so much to do before Thanksgiving rolls around.  We have so much that we are going to put out for Christmas and man!!!  Our booth is FULL right now!!!  We DID end up getting the WINDOW unit!  (I have GOT to get some pics on here that are more recent!!!)  I just finished up this coat tree the other day, and although it's all done and ready to go, it will wait with some other items that are being finished.  This piece started out all rickety and loose and ugly ugly ugly dark brown.  So... I decided to brighten it up a bit and totally shabby it up!  You can't really see it all that great here, but you have to see the whole thing.

So... to get this look I cleaned it really good.  I took it apart, which is the BEST way to clean it and prep it for paint.  I lightly sanded it and then used a paint on primer (which I forgot the name and it's at my mom's house but you can use whatever brand you prefer.)  I used a basic white primer that we got from Lowe's.  When painting the primer, I didn't completely cover it.  It was more like a quick brush over.  Then I used a coral pink flat paint from Valspar (I always use Valspar because it has my name in it, lol!) and dry brushed it over the white paint.  Again, I didn't coat it completely, just a quick brush over.  Finally, I used Minwax Polyurethane clear coat in satin.  I only used one coat but completely coated the tree and then went over some spots vigorously to rub off some of the paint down to the brown.  The white turned more of an antique white color which (in my opinion) really set this piece off.  I was totally in love with it and my mom didn't want to get rid of it!  This was the final product.
 I just LOVE this look, and the best thing about the shabby chic look is that it doesn't have to be perfect.  I keep telling my mom, "The best pieces are the 'oops' pieces!"  
I do have to say this... I am so bad about getting "before" pics.  I should really start just taking my before pics as soon as we get the pieces.  I am so sorry about not doing a better job of this blogging thing.  I hope to get better.


 photo Untitled-2-1.gif

Sunday, August 11, 2013

Movin' on UP!

It finally happened!  We outgrew our booth and had to get a bigger one!  We finally got everything moved and set up and it looks great!!!  Projects have been a little slow because of my work schedule, but things are about to slow down enough where I can get back to work on what I love to do!  Several projects are lined up and ready, I just need some TIME... which is something that I don't have a lot of at this moment... I just wanted to share with you some of the things in our new booth, AND... we are actually getting the booth next door to us and we actually have a FRONT WINDOW!!!  WOOHOO!  I am just itching to do a little window dressing!!!  I am so excited!

 I can't believe that the clock table is still there... the hubbs says that I should put a real working clock in it, Idk... maybe he's right.
 I have purchased a dress mannequin to put the jewelry on and that will free up the space on this wall.
 This was the first piece that my mom and I bought together... if we knew then what we know now, this purchase would not have happened... if it doesn't sell, I am going to redo it myself, hand painting all the coka-cola stuff on the table.
 If this buffet doesn't go soon, we will be redoing this one too.  There's a part of me that hopes it stays, I really want to slap some paint on that bad-boy!
 This is actually a very comfy couch... 
 Oh... the white elephant... I love this table and it took me almost a week to hand paint this... I wish it would go though!
 Lots of shelving for all those knick knack paddy wacks!
 Lots of bags and a beautiful mantle piece all the way from New York!
Our entrance!  Everyone loves it... you can't miss it when you walk in the door!  Draws you into our booth!  We still have lots more to bring in and a long ways to go to get it like we want it, but it's looking good and we get lots of comments on it.  :-)
 photo Untitled-2-1.gif

Sunday, May 26, 2013

Va Va La Vanity Bench!

What a month!!!  We have been busy relocating my mom's business from one place to another and trying to get that all in order and so our projects have been on the back burner for the last month.  We FINALLY managed to finish the AWESOME looking vanity bench that we started on about a month ago.  I don't think this one will last long!
This was a table with no top that was a roadside rescue.  (That is the best kind, right?)  Mom painted it and papa cut a piece of 1/4" plywood for the top, then we bought some 2" foam and cut that to fit on the board.  (FYI:  An electric knife really DOES work and cuts foam like a hot knife through butter!)  Then, after some playing with fabric, mom and I covered the top with the very pretty pink and black fabric that we found... it's thicker material, like upholstery material, maybe that's what it's called but I am not sure about that... Then I went around the edge with some pretty ribbon that I hot glued with a high temp glue gun.  There it is!  Like I said, I don't think that this one will last long!  Comments or questions welcomed!

 photo Untitled-2-1.gif

Saturday, April 27, 2013

Roman Numeral Clock Coffee Table

It's finally FINISHED!!!  It only took me a week to finally get it done, but here it is...  My clock coffee table!  We had our ups and downs during that week and the stenciling was a pain, but in the end it turned out just the way I imagined it would!  Mom and I took it up to The Blue Moon yesterday so that it would be there for the "weekend warriors" and hopefully it won't last long!  We only have a 10x10 space and we have more big furniture projects coming and these have got to go!  :-)

One thing that I did learn in the stenciling process is don't use the same paint you use on the furniture... which I did.  When I went to Hobby Lobby to get the stenciling stuff, they didn't have the stenciling paint color that I needed so I opted to use what I had (you know, beings that I am all frugal and stuff).  Well, don't do it.  The paint dried on my stencils, even though I put them in water after I used them until I could clean them.  Uh, yeah... didn't work out so well.  I am going to try some paint thinner on the stencils and see if I can get it off like that, but I have a feeling I will mess up my stencils.  Not a good thing.  (I will have to update this when I try and let you know what happens to my stencils.  Hopefully they won't melt or something disasterous happens).

I wanted to stencil around the design in the middle, "There is a time for everything" but at this point aggravation had set it and it wasn't fun anymore so  I decided to go with what I had.  I think that I will visit the Graphics Fairy next time.  :-)


 photo 0bddfabd-1427-4f73-866e-f78bf6b2d742.jpg

Tuesday, April 23, 2013

Mama's Poor Vase

Well, mama couldn't decide what to do with the vase... it's been painted and rubbed, scrubbed, and painted again.  It started out cream, then pink, then black, then rubbed off the wet black for the pink and cream to come through.  I don't think that it turned out too bad.  This pic doesn't really show the pink, but it's a light pink and then some of the cream came through as well. Personally, I think that it would be cute if there was an air plant in the top... maybe stuff the bottom with newspaper and then have some moss on the top and place and air plant in it.  I think that would be nice.  What do you think?
This will be heading to The Moon by Thursday!


 photo f4ca6578-f26c-4fe5-99fc-1a31e21b480f.jpg

Sunday, April 21, 2013

Paris Inspired Bulletin Board

I am so bad about taking pics before I touch anything... I am trying to remember to do this, but sometimes, it doesn't always happen... I scored this frame for only $1 at a yard sale.  It was a gaudy gold, but I sanded it down and cleaned it up and then sprayed it with white spray paint.  Then I took an "oops" pink that I got from my local Lowe's (which is a great place to get mis-tinted paint for a great price), and painted over the white.  Then, before it dried, I took a wet sponge and wiped off some of the pink to get this look...

Then I went to Hobby Lobby and found this perfect Paris fabric for it.  I decided on doing a bulletin board.  I already had the cork board left over from a previous project that I did for my daughter's room, so I went with it.  I had to go buy foam board from my local Walmart and then measured the opening of the frame, cut the foam board that size and then glued the cork board onto the foam board.  Used carpet tape which works PERFECT for little projects like this!  I then took the fabric, measured it to where I had about 1.5" on each side and then pulled it tightly to attach to the back.  After attaching the fabric, I attached the little clips that hold it in place, which it fit so tightly I really didn't need to, but I decided to go with it anyways.  I covered the back with kraft paper and attached with double sided tape and then placed the hanger on the back so it can hang on the wall... Voila!  This is the final look of my "Paris inspired" bulletin board.

So, that's it!  I should have taken more pics, but like I said, I am new to this whole thing and just need to get in the habit of doing that.  Sorry... if you have any questions though, just ask!  I will do my best to help you out as much as I can.  It's pretty simple though.  I have to make a couple more of these so I promise, next time, I will do the step by step for ya.  Until then, keep on craftin'!

 photo 7b1974b1-4595-40e0-80ee-b863edca346d.jpg